Showing posts with label purple. Show all posts

Sunday, November 11, 2012

Kiko Violet Microglitter

Hello everyone!

After a WHOLE NAKED week, I finally painted my nails! As it was a sleepless week I also did something quick (before I went to bed!).
I wanted something I would be sure I'd like, so I went for favorite color : purple!


This gorgeous glitter polish is Kiko - 255 Violet Microglitter!
Here I applied one coat on top of his brother: Kiko - 292 Light Grape a crème polish just a little lighter ;)

I wanted to add a little extra and went with a Konad bow from m59, using Stargazer - 232.


I this is a great combo, and I loooooved wearing this mani! It's pretty simple but was what I needed ;)

This weekend I went to a gastronomie and wine salon in my hometown and it was great:


Have a great day!

Candy <3


Follow Me on Pinterest

Wednesday, October 10, 2012

Tribal Galaxy!

Hello girls!

When I saw the tribal galaxy design that Mr Candiipants achieved inspired by a society6 phone case, I immediately wanted to make a try:


Sadly my acrylic paint pen (POSCA) wasn't opaque enough and crackled with my topcoat :/


I used a lot of colors for this design, starting by one coat of a dark green crème from Avon.

I sponged other colors from Avon: a light grey crème, a navy shimmer (similar to China Glaze - Rodeo Fanatic) and a purple glass fleck (similar to CG - Senorita Bonita).
I also sponged Orly - Butterfly and Biguine Makeup Gloss & Shock - Blue Lagoon.

Then I added one coat of China Glaze - Fairy Dust (thank you Nikki!) to give it a lot of sparkliness!

I decorated this galaxy using my white Posca and some holo gold hex glitter, then Out The Door Top Coat ;)


Did you liked it? I am disapointed of the opacity and crackling of the white paint but I think these are cute! Not as badass as Mr Candiipants' but a little more detailed :)

Have a great day!

Candy


Follow Me on Pinterest

Monday, September 24, 2012

Prada Chevron Mani with my Blueberry Glitter Franken!

 Hello everyone!

I hope you're doing allright! I'm working hard for my studies, but still had time for nail art!

I wanted to use my lastest franken and things happened that I had two untried colors that were making the perfect combination :D So I gave a try at the Prada pattern Sophy Robson introduced to the nail art world ;)


I'd describe my franken as a blueberry fine glitter mix. The polish is clear but packed with glitter. I mixed black, duochrome, bright blue, purple and blueberry holographic glitter.

Do you have a name for it? I was wondering about blueberry and cats (all my polishes have names about cats)... ?


Here is how I achieved the look:

I started with PVA glue as basecoat (my first try wasn't convincing :s). I applied one of Rouge Baiser - Gris Lavande to give more opacity before the coat of my franken (only one!).

With the polishes Kiko - 274 and Biguine Makeup Gloss & Schock - I freehanded the "V" lines.
Then I used a black marker to outline the geometric shapes.


Do you like this nail art? I'm a bit sad the lines aren't really sharp and contrasting, but I liiiiike it!

I hope the PVA glue basecoat won't make it pop off, I already have a chip on both my thumbs...

Have a great day!

Candy


Follow Me on Pinterest

Monday, September 17, 2012

Dream Catcher! Final of My Favorite Things Nail Challenge: Favorite Mani!

Hello everyone!

Long time no see! I'm sorry I've been busy this week because I'll be back to school in 2 hours!
I'm feeling lazy ><

BUT today I've got some badass nails for you! I'm showing you the latest mani of My Favorite Things Nail Challenge: MY FAVORITE MANI! (right now?)


I did these nails with the home made decals technique ;)

My background color is OPI - Skull & Glossbones (2 coats).
I freehanded the feathers using China Glaze - Purrfect Plum , Rouge Baiser - Gris Lavande, OPI - Fly , OPI - Did it On'Em , and OPI - Alpine Snow.
I outlined with Wet'n Wild - Black Crème.


These nails were inspired by the accent nails on this mani by Astro Wifey (which is SO talented!).
Do you like them? I'll never want to take them off !! :D

Thank you thank you Kelly for this fabulous challenge! I'm so sad it is over!


You can find more informations on the challenge here: Ohlalapolish's Nail Art Challenge


Have a great day! <3

Candy


Follow Me on Pinterest

Wednesday, August 15, 2012

Shredded Purple (My Favorite Thing Nail Art Challenge: "My Favorite Color!")

Hi everyone! :)

Today is the first day of a challenge I decided to join! Our post today needed to be our favorite color! As some may know, I always preferred purple! Purple jeans, nail polish (of course), eye makeup, pencils...

For this nail art, I wanted to use several purple nail polishes, here is the result:


To achieve this design, I started with 3 or 4 coats of Estée Lauder - White Petal. (Yes thats a lot but I did not found out a way to apply it smooth enough for my taste...)

Then I painted some scotch tape using several purple nail polishes:
Stargazer - 235
OPI - DS Extravagance
Debby - 91
Milani - Jewel FX Lavender + OPI - Houston we have a purple
Orly - Charged Up
Miss Cop - Vernis Pop Fluo n°6
OPI - Planks a lot

When they were all dry, I cut them with scissors in square and triangle pieces. I only had so stick them on and my nails were ready for topcoat!


I like how this design looks kind of a shredded glitter nail polish but is very rich. I like that it is modren but quite delicate :)

Do you like it? Let me know if you try this design out! :)


You can find more informations on the challenge here: Ohlalapolish's Nail Art Challenge


Have a great day and great polishes! <3

Candy


Follow Me on Pinterest

Wednesday, August 8, 2012

Zig zags fade = Missoni nail art! (+ Tutorial!)

Hello Everyone!

Today I have a post that almost doesn't look like a gradient, but original idea for this nails was a gradient. I wanted to do a stripe fade à la Mr Candiipants, but using zigzags instead of straight lines.

Then I realised my design was more like a Missoni pattern:


I wouldn't advise a special base color for this type of mani. In fact I used a random light blue (from a Forever 21 set) for a first coat of opacity. Then using every time a zigzag pattern with my tiny art brush, I covered it completely with different colors (from the cuticules to the edge):

OPI - Dutch'Ya Just Love OPI?
Miss Cop - Vernis Pop Fluo n°6
Forever 21 - Unnamed light purple from a set
Sephora - Jacuzzi Bubbles
Essie - Navigate Her
OPI - Uh-Oh Roll Down the Window
E. Pinaud - Chocolat


I am really happy with this manicure, but it took quite a long time to do the left hand: I had not time left to do zig zags on my right hand, so I did a skittle mani with the first 5 colors ;)
Sadly because I was late my right hand nails have been damage so I don't if I'm gonna enjoy this mani a long time :/

Do you like it?

Happy polishing to you ;)

_________________________________________________________________________________

I just finished a tutorial for this design, this is my first youtube video!


I hope you'll like it! :)


Follow Me on Pinterest

Tuesday, July 31, 2012

Lavender patchwork

Hello everyone!

I hope you are doing great!
I've been really busy, so here is a nail art from the vault! I think I did this 1 year and a half ago!


I started by one coat of a lavender franken I made from Seche - Blanc & China Glaze - Avalanche.
Then I did random white stripes with Seche - Blanc which I covered later with a stamping from the stamping plate m57 and the lavender franken.

I added the purple stripes using Debby - Color Play 91 and I stamped the previous design in random parts of the nails with Gosh - Purple Heart.
I finished by applying some little flower stickers and my topcoat! :)


I remember this was quite long to do but I think it was worth it ;)
I was inspired by the talented nekonotsume for this mani, check her blog out!

Let me know if you like this design ;)


Follow Me on Pinterest

Sunday, July 22, 2012

Trendy Geometric Design!

Hi everyone!

Today I'm gonna show you some nails I did in the middle of May! I didn't have my blog yet, but I thought the design was worth pics!

I was scrolling trough pinterest when I discovered this design by the talented Madeline Poole. I fell in love with this design and wasn't able to imagine other colors than the ones she used and get the same effect! I even mixed different polishes to get the particular shades of Madeline Poole's mani.


So I started applying two coats of China Glaze - First Mate (you see it a lot on my blog!) for 3 nails and two coats of Gosh - Fossil Grey for 2 nails.

Then I applied some tape in the diagonal of my nail to make the checkered pattern with Sally Hansen - Blush & Gosh - Fossil Grey for the blue based nails. For the other nails the checkered pattern is done with an anonymous burgundy & China Glaze - First Mate.

I freehanded the ruffian styled stripped with an anonymous red & Wet'n Wild - Black Crème topped with China Glaze - Senorita Bonita (for the blue based nails). For the other nails I used a green mix and again Wet'n Wild Black Crème ;)


I hope you liked this mani, I really did!
I find this design really classy, innovative, elegant.  So thank you Madeline Poole for this amazing inspiration you give us!

xoxo


Follow Me on Pinterest

Saturday, July 14, 2012

14th of July Nails!

Hello!

I hope you are having a good day :)

Today is the French National Day! I took a lot of time to think about what my nails should look like, but I wasn't inpired by the flag. I imagined a manicure with the important events celebrated but it was complicated and finally I was almost sure it would be messy, not aesthetic.

So I went simpler and I'm really satisfied with how it came out!


I used a lot of polishes to do this nail art!

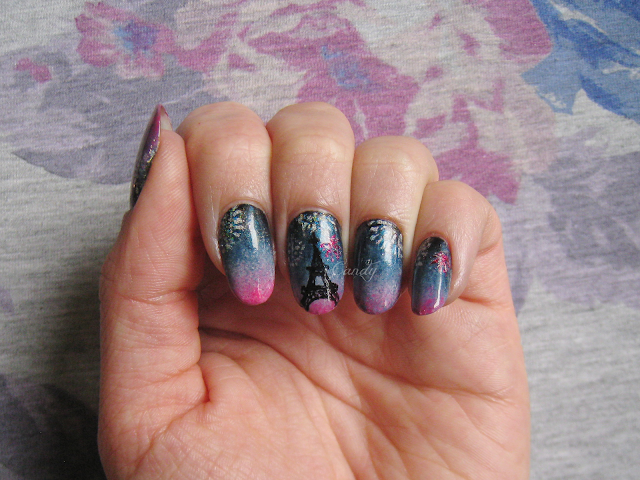
I began with a gradient using:
a mix of an anonymous red polish, OPI - We have a purple, China Glaze - Papaya punch
OPI - Alpine Snow
Sephora - Jacuzzi Bubbles
China Glaze - Rodeo Fanatic
Wet'n Wild - Black Crème

Then I freehanded the Eiffel Tower silhouette with WW - Black Crème.

The fireworks are made using Layla Cosmetics - Mercury Twilight, or Orly - Rock It (+ MT), or Nail Venturous - Floam (+ MT).


I hope you like this nail art as much as I do, I really like the fact that for a National Day design, I went original and cute!

Then I realized that my nails were the same exact color than one of my tees! I'll be wearing it today ;)

Did you liked that design? Are you doing french nails for today?

Happy polishing!


Follow Me on Pinterest

Friday, June 22, 2012

Lacey Half Moons

Hi all!

This is a third post with purple nails.. I'm sorry!
Today I'm showing you my second mani with the traveling polish: The Wanderer by Sassy Lacquer.
You can check my post explaining you what's this nail polish :)


Here The Wanderer was used as a base color with Rouge Baiser - Gris Lavande under it for the opacity (one coat of each).

I freehanded the lace with Seche - Blanc, in the shape of half moons.


Now it's time for me to say goodbye to The Wanderer, since the next person gave me her adress to send it to her ;) It was sure a great time, if you want to join the adventure, you can join the group here.

I hope you liked this mani, I promess my next post wont be another purple one ;)

Have a good day!

Candy <3


Follow Me on Pinterest

Thursday, June 21, 2012

Traveling Polish : The Wanderer


Hello you all!


Sorry I’ve not been posting a lot the past few days... I’ve been really busy with my short film that will be projected on monday! I’m also going back to my parents for the summer so I need to clean up my appartment etc...

Today I will be showing you The Wanderer! It is a pretty franken polish made by my friend Carrie Sasville. The purpose was to send this polish all over the world! This past 10 days it’s me that is hosting the gorgeous travelling polish. 
This is a Purple Jelly with fine black and fine holo glitters in it:


Here it is shown over  a more blue toned color: Gris lavande by Rouge Baiser. One coat of each! I think The Wanderer must be opaque in two coats.


The application was a bit tricky I admit, the polish tends to dry fast and it becomes goopy if you’re not applying it fast. But then happens the magic, when drying the nail polish smoothes itself perfectly!

I really love that polish and I hope Carrie kept the recipe and will be trying to sell it someday! Thank you Carrie for The Travelling Polish group and this gorgeous polish!

You can find Carrie’s others creations at a reasonable price on her shop: Sassy Lacquer.

Since the next person of The Travelling Polish group didn’t give me her adress yet, I’ve created another mani with The Wanderer! I’ll post it tomorrow ;)

Have a good day!

Candy <3
Follow Me on Pinterest

Sunday, June 17, 2012

From the Vault: Abstract tree

Hi all!

Since I lost hope in getting my old posts on this new blog, I decided to keep them to make "From the Vault" articles. Today is one of them!

This is a mani with just one accent nail that I litterally copied from Nailsymo. Google this name, this girls always make AWESOME manis! It seems like she has stopped to post nail art but I love her work!


The greyish lilac I used here is Gris Lavande (litterally the translation of "greyish lilac"!) from Rouge Baiser.I put two coats, but it's pretty opaque. :)
I freehanded the abstract tree design with Seche - Blanc, a tiny art brush and a dotting tool.
Rhinestones are the tiny silver ones from Swarowski.


Do you like this mani? Have you ever tryed to remake one of Nailsymo's manis?

Have a good day! :)

Candy Follow Me on Pinterest

Monday, June 11, 2012

OPI - Black Spotted !!!


Hi all!

Welcome for a very exciting post!

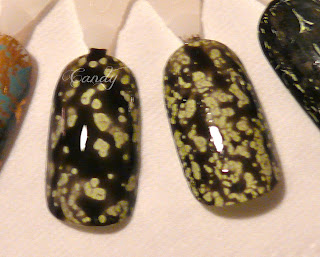
Today I'm gonna talk to you about a french exclusive OPI: Black Spotted!

Here I'm wearing it over a special polish: The Wanderer this a purple franken made by Carrie Sasville, and it travels the world! I’ve got him with me for one week only! But I’ll talk to you about this polish on an other post, today’s about the OPI!

Here are the pics:


I don't like crackles polishes, but this spotted look is more subtile!


Closer:


What is this nail polish?

It is an extra of the Spider Man Collection by OPI. This collection is the same in every country, but in France we have an extra: the Black Spotted, as in the us there is a different extra: Shatter The Scales (a green shimmer crackle). Both are interesting I think, but I prefer the spotted look, it is less dirty to my taste. Those polishes are not included in the Spider Man sets of minis.


OPI
The Amazing Spider Man


OPI                                   OPI   
Shatter the scales              Black Spotted
        (US)                         (FR Exclusive)


Application

Like a crackle polish, it is meant to be layered over another color. Contrarily to the crackle
the effect appears just when you apply it, you don’t have to wait to see the look. Dark colors won't be really noticeable underneath this black polish! 

*video coming very soon!*
This polish has to be applied in thin layers, if not it’ll not be able to make the spots.
Different applications will lead to different looks: the less brush strokes you use to apply it, the bigger the spots will be. If you insist with a lot of brush strokes the spots will spread: there will be more spots, and they’ll be smaller.


What can be under it?


Like a crackle polish you will have to wait until your first color is COMPLETELY DRY, or you will have strange results! Strangely, if you don't wait, the polish start to crackle where it didn't spotted!


 I kind of think that OPI labo people were trying to get a crackle polish that wasn't doomed to dry inside the bottle and they came up with this look!  Because this polish is very liquid, it will have the tendancy to run into the leaks of the polish underneath if for exemple it is a gritty glitter. This result become a little dirty. You can put a coat of top coat before applying the spotted polish to avoid that.

*It's 1 in the morning, and I forgot to take that pic, oupss*


This polish is so thin that you will get a smooth nail, not like with the crackles.
 This nail polish isn't fully opaque, so if you put it over glitter there will be places where it will look like a jelly sandwich and places where it is just like your glitter polish. This might be cool to use in a galaxy manicure!
Good news, this polish works over transfer foils, and foils resist to it! (foils have the tendency to become dusty and crackled with some top coats).


OPI - Black Spotted over African Jade transfer foil


This polish might a good tool in a lace mani too, I'll try this soon! It offers a TON of possibilities! :)


Durability

Some topcoat issues have been experienced with this polish, but I can't say if it was the topcoat that was old or an incompatibility with this particular topcoat. (Tenshi No Hana has had her Essie Good to Good peeling off over OPI - Black Spotted). 
I don’t know if my experience counts, because my top coat is a mix of Seche Vite and Poshé, but I didn’t experienced peeling yet... I’m wearing this mani since 2 days. Maybe I don't have issues because I wrap my tips?
This polish doesn't dry matte like the shatters and it does stay in place without topcoat, but it will get used pretty fast. 


Where to find it
You can find this nail polish in the french Sephora stores where it retails for 13€90. This is the normal price of a regular OPI in France, so maybe we are lucky to have the exclusivity of the access to this polish, usually OPI isn't nice with us!

As I'm a student I'll not be able to swap or take orders for it as my Paypal account is not linked to my bank account and I won't enough money on my bank account. Sorry ladies :/
Some of you might want to go ask to nailissima.fr, it is a website ressembling the french NPA community! :)

I hope you liked this post ;)
Bye! <3


Follow Me on Pinterest