Showing posts with label glitter. Show all posts

Sunday, November 11, 2012

Kiko Violet Microglitter

Hello everyone!

After a WHOLE NAKED week, I finally painted my nails! As it was a sleepless week I also did something quick (before I went to bed!).
I wanted something I would be sure I'd like, so I went for favorite color : purple!


This gorgeous glitter polish is Kiko - 255 Violet Microglitter!
Here I applied one coat on top of his brother: Kiko - 292 Light Grape a crème polish just a little lighter ;)

I wanted to add a little extra and went with a Konad bow from m59, using Stargazer - 232.


I this is a great combo, and I loooooved wearing this mani! It's pretty simple but was what I needed ;)

This weekend I went to a gastronomie and wine salon in my hometown and it was great:


Have a great day!

Candy <3


Follow Me on Pinterest

Tuesday, October 30, 2012

Starry Gradient

Hello everyone!

I'm sorry I haven't posted in a while! Still have a lot of work because of my studies, plus it was my 18th birthday! I hope I'll have more free time because I hate to keep a mani when it's chipped and I want to nail art more! :)

This month I received a lot of polish for my birthday being in an AWESOME birthday group! (I'll do a haul birthday gifts post soon!)  I was out of time but with bare nails so I decided to do a gradient combining some of my new polishes:


I had several replacement for my old Wet'n Wild - Black Crème which was becoming gloopy and my friend Yvonne sent me the pretty Essie - Going Incognito :)
I made a gradient with them using a makeup sponge, after one coat of Going Incognito.

On my ring finger I added one coat of Kleancolor - Silver Star (again: thank you Yvonne!) and it was perfectly sparkly!


I really enjoy this mani, do you like it?

Have a great day, I hope to post soon ;)

Candy


Follow Me on Pinterest

Wednesday, October 10, 2012

Tribal Galaxy!

Hello girls!

When I saw the tribal galaxy design that Mr Candiipants achieved inspired by a society6 phone case, I immediately wanted to make a try:


Sadly my acrylic paint pen (POSCA) wasn't opaque enough and crackled with my topcoat :/


I used a lot of colors for this design, starting by one coat of a dark green crème from Avon.

I sponged other colors from Avon: a light grey crème, a navy shimmer (similar to China Glaze - Rodeo Fanatic) and a purple glass fleck (similar to CG - Senorita Bonita).
I also sponged Orly - Butterfly and Biguine Makeup Gloss & Shock - Blue Lagoon.

Then I added one coat of China Glaze - Fairy Dust (thank you Nikki!) to give it a lot of sparkliness!

I decorated this galaxy using my white Posca and some holo gold hex glitter, then Out The Door Top Coat ;)


Did you liked it? I am disapointed of the opacity and crackling of the white paint but I think these are cute! Not as badass as Mr Candiipants' but a little more detailed :)

Have a great day!

Candy


Follow Me on Pinterest

Saturday, October 6, 2012

My Queen of hearts and her red roses!

Hi Nail Polish Addicts!

Here I am with a wonderful polish to show you! My friend Rachel generously accepted to blend me a custom polish (all the way from Australia!).


I didn't thought I could layer it over another color than grey, but I found other pretty combinations after all! Here I applied one coat over two coats of Zoya - Yara :)
If you are jealous and want to purchase it, go buy the inspiration for it: Once Upon A Polish - Queen of Hearts!

For the accent nails, after the background color was dry, I started by drawing roses with a fine white Posca (acrylic paint pen).
I added the drops of red using a tiny brush and China Glaze - Adventure Red-Y. I finally outlined them with the same brush and Wet'n Wild - Black Crème ;)


I am really in love with this polish and its combination with khaki! <3
I'm not sure if I did well with the accent nails though... What do you think?

Have a wonderful day ladies!

Candy


Follow Me on Pinterest

Monday, September 24, 2012

Prada Chevron Mani with my Blueberry Glitter Franken!

 Hello everyone!

I hope you're doing allright! I'm working hard for my studies, but still had time for nail art!

I wanted to use my lastest franken and things happened that I had two untried colors that were making the perfect combination :D So I gave a try at the Prada pattern Sophy Robson introduced to the nail art world ;)


I'd describe my franken as a blueberry fine glitter mix. The polish is clear but packed with glitter. I mixed black, duochrome, bright blue, purple and blueberry holographic glitter.

Do you have a name for it? I was wondering about blueberry and cats (all my polishes have names about cats)... ?


Here is how I achieved the look:

I started with PVA glue as basecoat (my first try wasn't convincing :s). I applied one of Rouge Baiser - Gris Lavande to give more opacity before the coat of my franken (only one!).

With the polishes Kiko - 274 and Biguine Makeup Gloss & Schock - I freehanded the "V" lines.
Then I used a black marker to outline the geometric shapes.


Do you like this nail art? I'm a bit sad the lines aren't really sharp and contrasting, but I liiiiike it!

I hope the PVA glue basecoat won't make it pop off, I already have a chip on both my thumbs...

Have a great day!

Candy


Follow Me on Pinterest

Tuesday, September 4, 2012

Cosmic Gradient! My Favorite Things Nail Challenge Day 7 "Glitter"

Hello everyone!

Today is day 7 of My Favorite Things Nail Challenge and the theme is Glitter!

When I think about glitter, I instantly think about a gradient if I want to do nail art. But I wanted to do something a bit complicated for the challenge so I went for a 4 polishes gradient:


As a basecoat I wanted to try using one coat of PVA glue, that's what I did so I'll keep you guys updated on my thoughts!

To achieve the design I started with one coat of China Glaze - Stone Cold, and sponged OPI - Metallic 4 Life on the up part of my nail.
Then I sponged Orly - Space Cadet on the bottom half of my nail and added some duochrome glitter from Kleancolor - Chunky Holo Black.


I really like the effect of this gradient, giving a fire and space aspect that is really cool!
I'm also fascinated with all the polishes I used for this mani so I really like it!

What do you think?


You can find more informations on the challenge here: Ohlalapolish's Nail Art Challenge


Have a great day! <3

Candy


Follow Me on Pinterest

Tuesday, August 21, 2012

My Favorite Thing Nail Art Challenge: "My Favorite Animal"

Hello everyone!

Today I am gonna show you a mani including cats! I really do looove cats!

My parents have 3 cats, my bf's mother 3 too and his father 2. And I think in the future months we are gonna adopt one too! I love their grace and their attitude, I love listening to their purr too! And they are really de-stressing when you pet them :)
I am also crazy about zebras, beavers and llama, but I preferred to do only one animal so that this mani doesn't look like a mess!

For this mani I started with two coats of various polishes:
OPI - Skull & Glossbones for my thumbs and ring fingers,
OPI - Sparrow Me The Drama for my index and pinkies,
Stargazer - 237 for my middle fingers.

For my gold blingy nails I added one coat of a F21 polish that looks the twin of LA Colors Color Craze - Goddess (I think they are the same polishes but different labels are printed on the bottles). I layered two more coats of polish: an unnamed baby pink & pale green chunky glitter from Claire's.

For the kitty design, I started by freehanding the global shape with Wet'n Wild Black Crème (isn't that polish in every of my posts?). Then I took my OPI - Alpine snow for the details and I colored the little noses with Sparrow Me The Drama. :)

For my right hand, I used the method of home made stickers for the little cats ;)


I am really in love with this mani, it is very fun and girly but in the same time grey and black look classy together! What do you think?


And now a SURPRISE! I have more pictures about my favorite animals for you! They were made one year ago so sorry for the bad quality of the pics!


For my beaver mani, I started with two coats of Essie - Sew Psyched (<3).
Then I freehanded the beaver with a tiny nail art brush.
I used Essie - Chinchilly for the principal color of the beaver, Sèche - Blanc for the eyes and teeth, a mixture of both for the cheeks and Sally Hansen Insta-Dri - Slick Slate for the details of the cheeks, nose and ears.


For this simple zebra design, I started with two coats of Sally Hansen Chrome - Champagne Pearl.
Then I added the stamping zebra design that can be found on the plate m57 using Konad Special Black.

Did you like those old manis? Which animal mani do you prefer?
I might need to come out with a llama design now ;)


You can find more informations on the challenge here: Ohlalapolish's Nail Art Challenge


Have a great day! <3

Candy


Follow Me on Pinterest

Thursday, July 19, 2012

Gradient & Zigzags with Floam!

Hello!

I hope you are having a wonderful day! Sorry, I meant to post this nails yesterday but I haven't been able to take pics! This is a mani I imagined a long time ago and I was really excited to do it!


I started with two coats of China Glaze - First Mate.

Then I applied Nail Venturous - Floam in a gradient design, and I created a zigzag design for the accent  nail!


I hope you like it!

<3


Follow Me on Pinterest

Saturday, July 14, 2012

14th of July Nails!

Hello!

I hope you are having a good day :)

Today is the French National Day! I took a lot of time to think about what my nails should look like, but I wasn't inpired by the flag. I imagined a manicure with the important events celebrated but it was complicated and finally I was almost sure it would be messy, not aesthetic.

So I went simpler and I'm really satisfied with how it came out!


I used a lot of polishes to do this nail art!

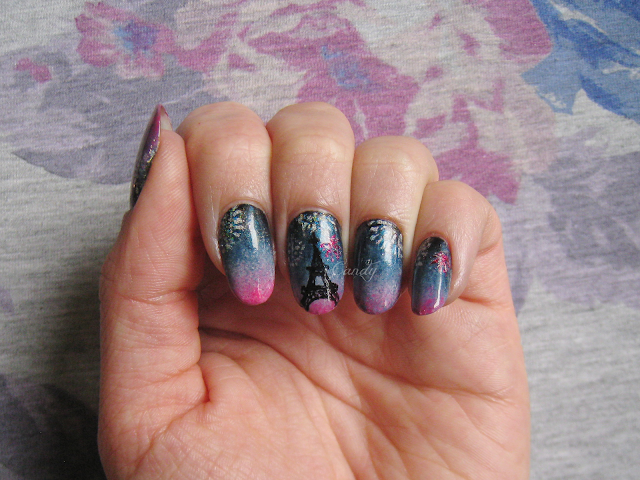
I began with a gradient using:
a mix of an anonymous red polish, OPI - We have a purple, China Glaze - Papaya punch
OPI - Alpine Snow
Sephora - Jacuzzi Bubbles
China Glaze - Rodeo Fanatic
Wet'n Wild - Black Crème

Then I freehanded the Eiffel Tower silhouette with WW - Black Crème.

The fireworks are made using Layla Cosmetics - Mercury Twilight, or Orly - Rock It (+ MT), or Nail Venturous - Floam (+ MT).


I hope you like this nail art as much as I do, I really like the fact that for a National Day design, I went original and cute!

Then I realized that my nails were the same exact color than one of my tees! I'll be wearing it today ;)

Did you liked that design? Are you doing french nails for today?

Happy polishing!


Follow Me on Pinterest

Tuesday, July 10, 2012

Gold & Peach

Hi everyone!


Today I have a delicate mani to show you! It is based on what my cousin asked me to do on her nails, and because it involved by recent lemming acquisition I had to do them on me too!


Here you can see two coats of China Glaze - Peachy Keen with a pinch of gold glitter thrown on still wet clear polish.

I've wanted Peachy Keen since a long time but I had bought what looked like a dupe in the bottle, but was almost neon once applied: Revlon Peachy! I was really disapointed with the Revlon but didn't wanted to spend money again on my real lemming, til June this year. This time I am very happy with the peach polish I got! And I was able to sell the Revlon (that I never used), yay!


I hope you liked the mani, my cousin and I were really happy to wear this design! :)
Let me know what you think ;)


Follow Me on Pinterest

Monday, July 2, 2012

Pink gradient with black & white glitter

Hi everyone!

Here is a mani I made yesterday (when I had my camera with me it was already night so I wasn't able to take pics)!

When I discovered Lynnderella - Connect the Dots it was already hard to get, since it's the only nail polish that I wanted for her, I just dreamed that I could have it someday but I didn't wanted to get involved in any drama! And then, in January or February, a friend of mine was choosed in the Llarowe's lottery and she generously offered me to order it for me! (Thank you again!)
Nowadays, there is a lot of drama going on but everyone has his opinions about it, and I'm here to talk you about the polish, not the one who makes it! ;)


For this mani I put two coats of OPI - Sparrow me the Drama, then I shaded it into Rimmel - .
Then I applied one generous coat of Lynnderella - Connect the Dots.


I hope you like this mani! I feel like there's something wrong... Maybe it's too messy? What do you think?

xoxo


Follow Me on Pinterest

Tuesday, June 26, 2012

From the Vault Peacock

Hi!

Today I'm showing you some nails from the vault! I've been really busy packing and cleaning my appartment for the summer (we rent it to a friend). Yesterday I was officially on vacation because we projected our short film (link if you want to see it). So I had a lot of things to do and no time to do my nails before tonight!

The mani I'm showing you was made in September 2011! I followed a video from Robin Moses to achieve the look:


The base color is Confetti - Moonstruck. I used Seche - Blanc for the white, Stargazer - 237 for the gold (mixed with a black nail polish to get the dark bronze color).

I used a lot of blue and green nail polishes to make a gradient, mix them to get the colors I wanted: Wet'n Wild - Wild Shine -Caribbean Frost , China Glaze - First Mate,  Biguine Makeup - Gloss & Shock - Dark Green and an unnamed "bambou green" by Modelite.

I added glitter to the feathers with a nail polish packed with gold and hex holo glitters from a Love & Beauty Set (from Forever 21 last summer).


I hope you liked this mani, I was really in love! For my right hand what I did was feathers for every nail. I remember I kept this mani 10 days!

Let me know if you like it and if you try it!

Have a good day,

Candy <3


Follow Me on Pinterest

Friday, June 22, 2012

Lacey Half Moons

Hi all!

This is a third post with purple nails.. I'm sorry!
Today I'm showing you my second mani with the traveling polish: The Wanderer by Sassy Lacquer.
You can check my post explaining you what's this nail polish :)


Here The Wanderer was used as a base color with Rouge Baiser - Gris Lavande under it for the opacity (one coat of each).

I freehanded the lace with Seche - Blanc, in the shape of half moons.


Now it's time for me to say goodbye to The Wanderer, since the next person gave me her adress to send it to her ;) It was sure a great time, if you want to join the adventure, you can join the group here.

I hope you liked this mani, I promess my next post wont be another purple one ;)

Have a good day!

Candy <3


Follow Me on Pinterest

Thursday, June 21, 2012

Traveling Polish : The Wanderer


Hello you all!


Sorry I’ve not been posting a lot the past few days... I’ve been really busy with my short film that will be projected on monday! I’m also going back to my parents for the summer so I need to clean up my appartment etc...

Today I will be showing you The Wanderer! It is a pretty franken polish made by my friend Carrie Sasville. The purpose was to send this polish all over the world! This past 10 days it’s me that is hosting the gorgeous travelling polish. 
This is a Purple Jelly with fine black and fine holo glitters in it:


Here it is shown over  a more blue toned color: Gris lavande by Rouge Baiser. One coat of each! I think The Wanderer must be opaque in two coats.


The application was a bit tricky I admit, the polish tends to dry fast and it becomes goopy if you’re not applying it fast. But then happens the magic, when drying the nail polish smoothes itself perfectly!

I really love that polish and I hope Carrie kept the recipe and will be trying to sell it someday! Thank you Carrie for The Travelling Polish group and this gorgeous polish!

You can find Carrie’s others creations at a reasonable price on her shop: Sassy Lacquer.

Since the next person of The Travelling Polish group didn’t give me her adress yet, I’ve created another mani with The Wanderer! I’ll post it tomorrow ;)

Have a good day!

Candy <3
Follow Me on Pinterest

Monday, June 11, 2012

OPI - Black Spotted !!!


Hi all!

Welcome for a very exciting post!

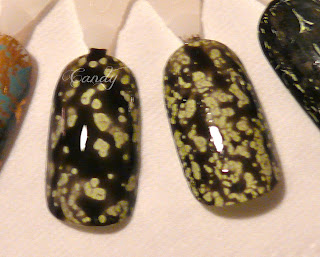
Today I'm gonna talk to you about a french exclusive OPI: Black Spotted!

Here I'm wearing it over a special polish: The Wanderer this a purple franken made by Carrie Sasville, and it travels the world! I’ve got him with me for one week only! But I’ll talk to you about this polish on an other post, today’s about the OPI!

Here are the pics:


I don't like crackles polishes, but this spotted look is more subtile!


Closer:


What is this nail polish?

It is an extra of the Spider Man Collection by OPI. This collection is the same in every country, but in France we have an extra: the Black Spotted, as in the us there is a different extra: Shatter The Scales (a green shimmer crackle). Both are interesting I think, but I prefer the spotted look, it is less dirty to my taste. Those polishes are not included in the Spider Man sets of minis.


OPI
The Amazing Spider Man


OPI                                   OPI   
Shatter the scales              Black Spotted
        (US)                         (FR Exclusive)


Application

Like a crackle polish, it is meant to be layered over another color. Contrarily to the crackle
the effect appears just when you apply it, you don’t have to wait to see the look. Dark colors won't be really noticeable underneath this black polish! 

*video coming very soon!*
This polish has to be applied in thin layers, if not it’ll not be able to make the spots.
Different applications will lead to different looks: the less brush strokes you use to apply it, the bigger the spots will be. If you insist with a lot of brush strokes the spots will spread: there will be more spots, and they’ll be smaller.


What can be under it?


Like a crackle polish you will have to wait until your first color is COMPLETELY DRY, or you will have strange results! Strangely, if you don't wait, the polish start to crackle where it didn't spotted!


 I kind of think that OPI labo people were trying to get a crackle polish that wasn't doomed to dry inside the bottle and they came up with this look!  Because this polish is very liquid, it will have the tendancy to run into the leaks of the polish underneath if for exemple it is a gritty glitter. This result become a little dirty. You can put a coat of top coat before applying the spotted polish to avoid that.

*It's 1 in the morning, and I forgot to take that pic, oupss*


This polish is so thin that you will get a smooth nail, not like with the crackles.
 This nail polish isn't fully opaque, so if you put it over glitter there will be places where it will look like a jelly sandwich and places where it is just like your glitter polish. This might be cool to use in a galaxy manicure!
Good news, this polish works over transfer foils, and foils resist to it! (foils have the tendency to become dusty and crackled with some top coats).


OPI - Black Spotted over African Jade transfer foil


This polish might a good tool in a lace mani too, I'll try this soon! It offers a TON of possibilities! :)


Durability

Some topcoat issues have been experienced with this polish, but I can't say if it was the topcoat that was old or an incompatibility with this particular topcoat. (Tenshi No Hana has had her Essie Good to Good peeling off over OPI - Black Spotted). 
I don’t know if my experience counts, because my top coat is a mix of Seche Vite and Poshé, but I didn’t experienced peeling yet... I’m wearing this mani since 2 days. Maybe I don't have issues because I wrap my tips?
This polish doesn't dry matte like the shatters and it does stay in place without topcoat, but it will get used pretty fast. 


Where to find it
You can find this nail polish in the french Sephora stores where it retails for 13€90. This is the normal price of a regular OPI in France, so maybe we are lucky to have the exclusivity of the access to this polish, usually OPI isn't nice with us!

As I'm a student I'll not be able to swap or take orders for it as my Paypal account is not linked to my bank account and I won't enough money on my bank account. Sorry ladies :/
Some of you might want to go ask to nailissima.fr, it is a website ressembling the french NPA community! :)

I hope you liked this post ;)
Bye! <3


Follow Me on Pinterest